Installing a LAMP server with Ansible playbooks and roles
In my previous post I introduced you to Ansible. I showed you how to install Ansible, how to create a server inventory and how to execute some basic commands. Afterwards we installed a very basic web server with PHP and Apache and we ended up with a working Hello World script.
In this post I will show you how to organize your server configuration using playbooks and roles. As an example we will install MariaDB 10.0 beta.
Playbooks
Ansible uses playbooks to combine tasks to be executed when provisioning a server. I will demonstrate a simple playbook with the tasks we performed in my previous post.
Remember the todo list?
- Install Apache
- Install PHP
- Start Apache
- Show "Hello World!"
Let's convert the ad hoc commands we used into the following playbook:
# playbook.yml
---
- hosts: all
  tasks:
    - name: 1. install Apache
      apt: name=apache2 state=present

    - name: 2. install PHP module for Apache
      apt: name=libapache2-mod-php5 state=present

    - name: 3. start Apache
      service: name=apache2 state=running enabled=yes

    - name: 4. install Hello World PHP script
      copy: src=index.php dest=/var/www/index.php mode=0664
First of all, a playbook is formatted in YAML.
It consists of a hosts property which defines which of your servers or groups you want to apply the following tasks.
A task consists of a name and an action. An action consists of a module name and module options. The modules used in this example are apt, service, copy.
The first task tells Ansible to use the apt module for package apache2 and make sure it is installed. The same goes for package libapache2-mod-php5 in the second task.
The third task will make sure the apache2 service ends up running and will be enabled on boot.
Now the fourth tasks seems very simple. But you have to keep in mind that the file src is on your local machine and dest is on your remote machine.
Let's create the index.php file before running the playbook:
<?php
echo "Hello World!";
We can reuse the inventory file containing our Vagrant box:
#hosts
10.0.0.10    ansible_ssh_user=vagrant    ansible_ssh_private_key_file=~/.vagrant.d/insecure_private_key
Now you can execute this playbook:
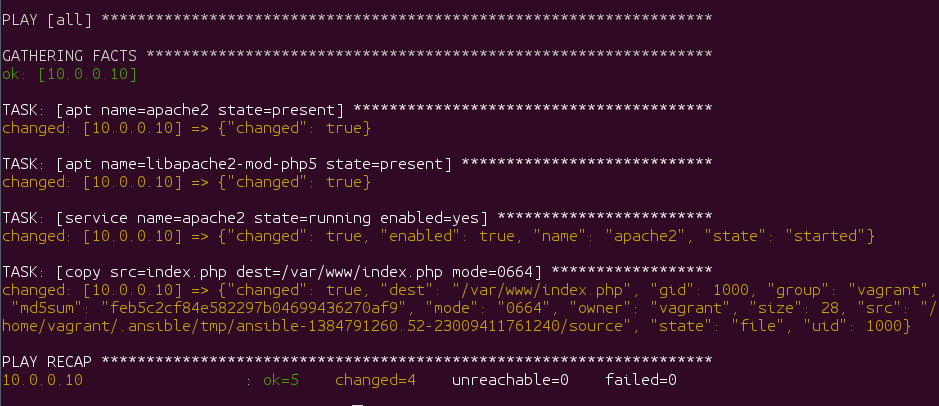
$ ansible-playbook --inventory-file=hosts playbook.yml --sudo --verbose
When you browse to http://10.0.0.10/index.php you will see "Hello World!"!
Roles
So now we have a running web server. What about a database server on the same machine? Hang on. That's fine for my development server, but in production my database runs on a different server altogether.
We need roles!
A role is a set of tasks and configuration grouped by a common functionality or responsibilty. For instance a web server is a role, or a database server. When installing a web server you need to install Apache or nginx and PHP. You need to configure your virtual hosts. You need to deploy your website. All are tasks related to a web server.
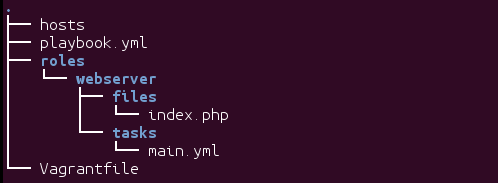
Ansible provides us with a directory structure for organizing roles. Let's rewrite what we've done so far into roles. First we create a project directory structure like this:
We can move the tasks from the playbook to the main.yml in the webserver role and include the role in the playbook.yml:
# roles/webserver/tasks/main.yml
---
- name: 1. install Apache
  apt: name=apache2 state=present

- name: 2. install PHP module for Apache
  apt: name=libapache2-mod-php5 state=present

- name: 3. start Apache
  service: name=apache2 state=running enabled=yes

- name: 4. install Hello World PHP script
  copy: src=index.php dest=/var/www/index.php mode=0664
# playbook.yml
---
- hosts: all
  roles:
    - webserver
Executing the playbook will give the same result as before.
Adding the M to the LAMP
It's time to install a database! Using roles this is fairly easy. Let's make a checklist first:
- Install MariaDB package
- Start MariaDB service
- Create database
- Create database user
- Import database
- Install MySQL extension for PHP
- Copy PHP script to query the database
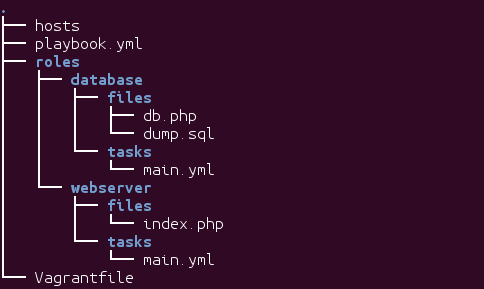
Create the following directory structure:
Add the following files. (Or get them from our GitHub repo).
# roles/database/tasks/main.yml
---
- name: 1a. Add APT GPG signing key
  apt_key: url=http://keyserver.ubuntu.com/pks/lookup?op=get&search=0xCBCB082A1BB943DB state=present

- name: 1b. Add APT repository
  apt_repository: repo='deb http://ftp.osuosl.org/pub/mariadb/repo/10.0/ubuntu $ansible_distribution_release main' state=present update_cache=yes

- name: 1c. Install MariaDB server package
  apt: name=mariadb-server state=present

- name: 2. Start Mysql Service
  service: name=mysql state=started enabled=true

- name: Install python Mysql package #required for mysql_db tasks
  apt: name=python-mysqldb state=present

- name: 3. Create a new database
  mysql_db: name=demo state=present collation=utf8_general_ci

- name: 4. Create a database user
  mysql_user: name=demo password=demo priv=*.*:ALL host=localhost state=present

- name: 5a. Copy sample data
  copy: src=dump.sql dest=/tmp/dump.sql

- name: 5b. Insert sample data
  shell: cat /tmp/dump.sql | mysql -u demo -pdemo demo

- name: 6. Install MySQL extension for PHP
  apt: name=php5-mysql state=present
# roles/database/files/dump.sql
CREATE TABLE IF NOT EXISTS demo (
  message varchar(255) NOT NULL
) ENGINE=MyISAM DEFAULT CHARSET=utf8;

INSERT INTO demo (message) VALUES('Hello World!');
# roles/database/files/db.php
<?php

$connection = new PDO('mysql:host=localhost;dbname=demo', 'demo', 'demo');
$statement  = $connection->query('SELECT message FROM demo');

echo $statement->fetchColumn();
Now run the playbook again:
ansible-playbook -i hosts playbook.yml --sudo
Check http://10.0.0.10/db.php and it's Hello World again! This time using a database!
Conclusion
Ansible makes configuration management really easy by introducing simple and reusable concepts like playbooks and roles. Also the YAML syntax is familiar to a developer like me which makes it easier to step into the DevOps domain.
My next blog posts will showcase some specific examples where Ansible comes in good use like provisioning a Vagrant box, how to easily install XHProf and XHGUI and how to setup Symfony Standard edition on HHVM.
Acknowledgements
Tnx @robottaway for explaining the alternative for apt-key adv using Ansible!


