Asynchronous Phystrix explained
We started this blog series with the basics of a circuit breaker. Our second post showed a running demo of an API consisting of two private microservices using oDesk’s Phystrix. The demo consisted of asynchronous calls using ReactPHP.
The demo itself shows a working circuit breaker, but I didn’t explain how Phystrix actually works. This blog will go through the demo code and show the changes we had to make to get Phystrix running asynchronously, while also looking more in-depth as to how Phystrix actually works. Awesome!
Modifying Phystrix
Before we get to the code we’ll first take a look at how Phystrix works.
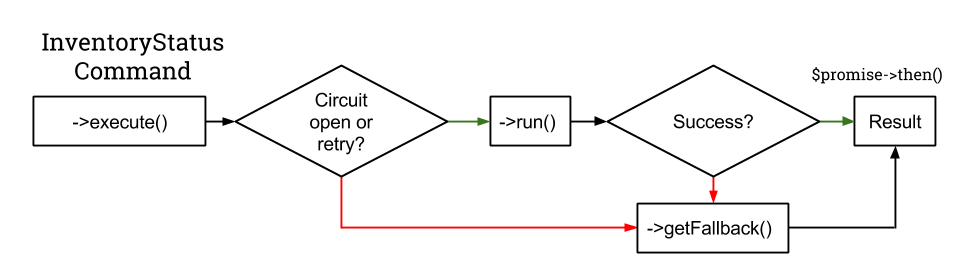
Phystrix is based on commands. When creating a Phystrix command you have to
implement a run() method that performs the actual action (which could be a
database query, an API call, etc.) and a getFallback() method which provides
default values. When calling execute() Phystrix will first call the run()
method. If this fails, it will call the getFallback() method. If too many
errors occur in a row Phystrix will ‘trip’ the circuit breaker. If the
run() method was successful it will ‘reset’ the tripped circuit.
abstract class AbstractAsyncCommand
{
    abstract protected function run();         // actual code that might fail
    abstract protected function getFallback(); // optional fallback if it failed
}

In order to allow for asynchronous programming, the run() method should
return a Promise instead of waiting for the result. If
this Promise fails the getFallback() function should still be called. The
execute method should thus consider tripping the circuit if the Promise
resolves into a RejectedPromise.
Our async command allows for just that. This commit shows the changes we had to make to Phystrix to get everything running.
The commands in our Demo
For each of the API calls in our demo application we created an asynchronous Phystrix command. The code is shown below, but feel free to click here and here for the source code.
class GetInventoryStatusCommand extends AbstractAsyncCommand
{
    // ...
    protected function run()
    {
        return \React\Promise\race([
            $this->client->get($this->url)->then(function($response) {
                return json_decode($response->getBody(), true);
            }),
            $this->timeoutFactory->create(500)
        ]);
    }

    protected function getFallback()
    {
        return [
            '42' => -1,
            '1337' => -1
        ];
    }
}
and
class GetCatalogueCommand extends AbstractAsyncCommand
{
    // ...
    protected function run()
    {
        return \React\Promise\race([
            $this->client->get($this->url)->then(function($response) {
                return json_decode($response->getBody(), true);
            }),
            $this->timeoutFactory->create(10)
        ]);
    }
}
Both commands use the asynchronous Browser and a race condition to set a timeout. The race function resolves into the first promise that is resolved. The timeout factory creates a Promise that gets rejected after the timeout has expired. If the Client fetches the information before the timer has expired the race function will resolve into a FulfilledPromise containing the result of the API call. If the browser takes too long the timeoutFactory will resolve first, resulting in a RejectedPromise.
The GetInventoryStatusCommand has a fallback: the inventory of all items is set
to -1. The GetCatalogueCommand does not have a fallback, which means the
error will still be propagated when the Catalogue service is down. Note that
the fallback function can return either an actual value or a Promise.
Using the commands
Creating and executing a command can be done using Phystrix’s factory method:
$command = $this->phystrix->getCommand(
    'Qandidate\\Phystrix\\Async\\Demo\\GetInventoryStatusCommand',
    $this->client,
    $this->timeoutFactory
);

$promise = $command->execute();
The getCommand() method initializes the circuit breaker for the command. The
first argument is the command class, the others are the constructor arguments
for the given command.
We can now get to the result of the promise by using the then() function:
$promise->then(function($data) {
    // $data contains the result of the API callback, possibly the value provided by getFallback
});
This schedules a callback that is executed once the promise has been resolved.
Pro tip
When creating an API I advice you to also create a client library that calls this API. This client library can then implement Phystrix commands for the various calls. The advantage of this is that the users of your library don’t have to worry about integrating a circuit breaker - you have done it for them!